Custom Channel
Integrate third-party messaging app into YesHello dashboard
This feature is currently in Beta. If you encounter any issues, please contact us here!
How it works
Receiving a Message:
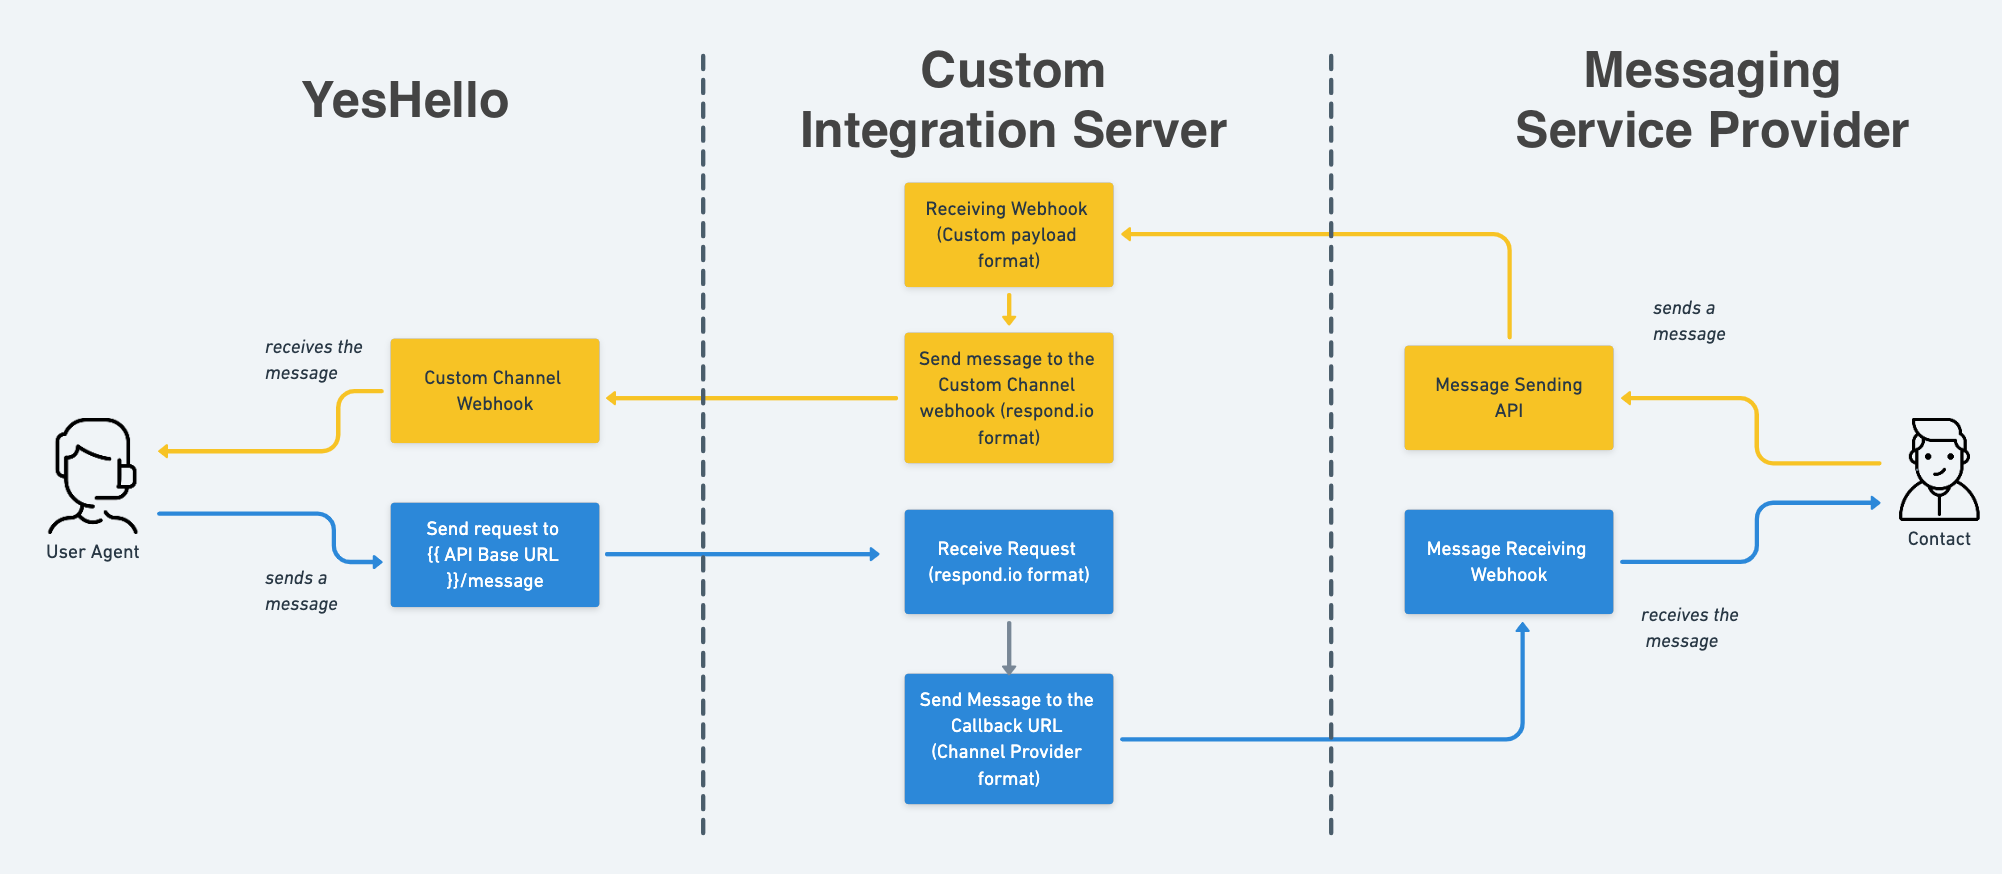
To receive a message via a Custom Channel, the following steps need to be followed:
When a contact attempts to send a message, the messaging service provider will call your custom integration server with the message payload (please review API documentation of messaging service provider for reference).
Your custom integration server will receive the message and will post it to YesHello (in YesHello format).
YesHello will receive the post request, save the message and display it on the messaging module.
Sending a Message:
To send a message via a Custom Channel, the following steps need to be followed:
When a User/Workflow/Broadcast will attempt to send a message, YesHello will call your custom integration server with the message payload (in YesHello format).
Your custom integration server will receive the message and will post it to the messaging service provider in the format that they require (please review API documentation of messaging service provider for reference).
The messaging service provider will receive the Webhook and confirm if the message has been delivered successfully. Tips, if the message is not delivered successfully you can try adding a retry mechanism in your custom integration server.
Configuration
Step 1: Create a channel
In YesHello platform, go to the Settings > Channels and click on
ADD CHANNELbuttonSelect Custom Channel
Enter the
API Base URLSelect the
ID typefor the channel and click NEXT. This ID is for the purpose of user identification and will be used to communicate with your custom integration server. There are two types of IDs available:Phone Number: Use this if the messaging service provider recognizes contacts based on their Phone Number.
Sample format:
+60177872111Custom ID: Use this if the messaging service provider recognizes contacts based on a custom-generated ID.
The maximum character length is 50
A-Z,a-z,0-9,_,=,+,/and@are allowed.
The following dialog will provide the
Channel ID,API Token, andWebhook URLe.g.Channel ID:
gfd8g7fd89dgfdAPI Token:
aaaxczsadzxcasdacxzcasdaaaxczsadzxcasdacxzcasdWebhook URL:
https://app.yeshello.chat/custom/webhook
Tips: Using Phone Number ID type allows you to initiate a conversation and send the first message to a contact.
Step 2: Pass Messages to YesHello
Webhook URL is used to POST the Messages, Messaging Echoes and Messaging Receipts to the YesHello platform.
The following code will be calling the webhook on the YesHello platform and will be creating the contact (if it does not exist) and saving the message against the contact.
Fields
| Field | Description | Validation |
|---|---|---|
channelId | Unique Channel ID | Required. Unique field. Is generated by YesHello |
contactId | Unique Contact ID | Required. Unique YesHello contact id. Max 50 char |
events.type | Event type | Required. message |
events.mId | Message ID | Required. Unique message ID. Max 50 char |
events.timestamp | UNIX Epoch Time(milliseconds) | Required. Time of the event that triggered the callback |
events.message.type | Message type | Required. Available message types: text, attachment, location and quick_reply Refer Message Type section for other message type samples. |
events.message.text | Message text | Required. Max length 7,000 characters |
contact.firstName | First name | Optional. Max 50 characters |
contact.lastName | Last name | Optional. Max 50 characters |
contact.profilePic | Profile pic URL | Optional. Avatar size should be no more than 100 kb. Recommended 720x720 |
contact.locale | Locale Code | Optional. Refer here for the list of values. |
contact.countryCode | Country Code | Optional. 2 letters country code - ISO ALPHA-2 Code |
contact.timezone | Time zone | Optional. (min: -24) (max: 24) |
contact.email | Email address | Optional. Max 50 characters |
contact.phone | Phone number | Optional. Max 18 characters |
contact.language | Language | Optional. ISO 639-1 |
Response - Success (HTTP status → 200)
Step 3: Handle Outgoing Messages from YesHello
YesHello will be calling the following endpoint <API Base URL>/message
Important: Make sure that you implement Outgoing Message code on the /message route in your web server
Here is the cURL example of YesHello calling the endpoint
Response - Success (HTTP status → 200)
Authentication has to be done on the endpoint before passing the message to the Messaging Service Provider. Here is an express middleware example
Messages Type
Sample for Text
Fields
| Field | Description | Validation |
|---|---|---|
type | Message type | Required. text |
text | Message text | Required. Max length 7,000 characters |
Sample for Media File
| Field | Description | Validation |
|---|---|---|
type | Message type | Required. text |
attachment.type | Attachment type | Required.Available attachment types: image, video, audio and file |
attachment.url | URL | Required. Max 2,000 characters. Make sure it’s a public link so users or contacts able to see the content |
attachment.mimeType | Mime type of the attachment | Optional |
attachment.fileName | File name | Optional. File name should include extension. Max 256 characters (including file extension). Sending a file without extension or with the wrong extension might cause the contact or user to be unable to open the file |
attachment.description | File description | Optional. Max 256 characters. Only applicable for attachment.type = image |
Sample for location
| Field | Description | Validation |
|---|---|---|
type | Message type | Required. location |
latitude | Coordinates | Required. Latitude (±90°) within valid ranges |
longitude | Coordinates | Required. Longitude (±180°) within valid ranges |
address | Location Address | Optional. Max 256 characters |
Sample for Quick Reply
| Field | Description | Validation |
|---|---|---|
type | Message type | Required. quick_reply |
title | Quick reply title | Required. Max 256 characters |
replies | Reply text | Required. Max 10 replies with max 256 characters for each reply |
Troubleshoot
This feature is currently in Beta. If you encounter any issues, please contact us here!
Last updated