WhatsApp Message Templates
Use WhatsApp Message Templates to re-engage with your contacts after the messaging window.
What is WhatsApp Message Templates?
As of now, our WhatsApp API Partners (excluding Chat API) has a timeout period that does not allow sending a message after 24 hours messaging window. This timeout period, also known as the Customer Care Window, starts from the last incoming message sent by the contact. However, there is a way to send messages after this window using a feature provided by WhatsApp known as Message Template.
WhatsApp Message Templates are plain text messages that are individually approved by the WhatsApp team to ensure they do not violate the WhatsApp policies. Businesses must use WhatsApp Message Templates when first reaching out to users or when sending a message 24h after the last message from the user. However, WhatsApp Message Templates does incur a cost for every message sent to a contact.
Setting up WhatsApp Message Template
In order to send these message template to the contacts, the message templates needs to be submitted for review and approval by WhatsApp. This can be done via the WhatsApp API Partners portal or Facebook.
Please refer to the respective WhatsApp API Partners to set up the WhatsApp Message Template :
Sending a WhatsApp Message Templates
Once the templates are approved, you may start sending it to your contacts. Bear in mind that, there are two pre-requisites that you have to fulfil before sending a message template to your contact.
The WhatsApp message templates are approved by WhatsApp and defined in YesHello Platform
The messaging window of the contact has exceeded 24 hours and expired.
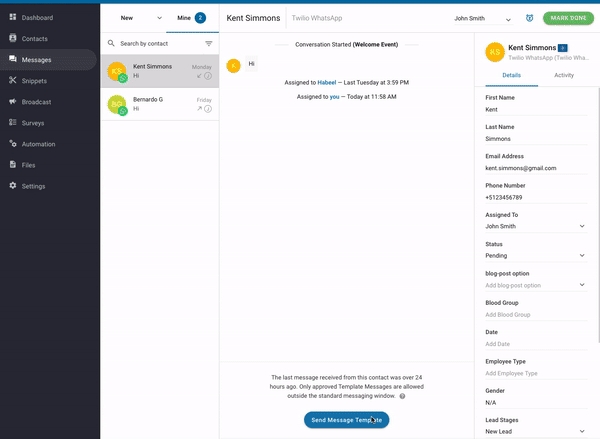
For a contact that came through WhatsApp, you will be prompted to send a WhatsApp Message Template if the messaging window has expired.
Press 'Send Message Template' located at the messaging window.
Select the template you wish to send to the contact
Fill in the required fields defined in the template. You may use Dynamic Variables to fill in the required fields.
Review the information and press 'SEND' when you are ready.
Last updated