Gmail
Connect YesHello to Gmail or Gsuite account and start receiving emails on the platform
To connect Gmail, a Google Workspace (formerly known as GSuite) account is required. Read more here on how to create the account
Gmail is a free email service developed by Google. Users can access Gmail on the web and using third-party programs that synchronize email content through POP or IMAP protocols.
This feature is still currently in BETA release and undergoing verification by Google Cloud team. You might be presented with "The app isn't verified" during the connection process.
As of now, Gmail channel does not support Contacts API and Zapier Integration due to technical regulations.
Before connecting Gmail
Due to security purposes, you will need whitelist the respond.io Google app in your Google Workspace Admin before connecting your organization's account to the platform.
You may refer to this official guide by Google on how to whitelist a third-party app to access Google Workspace data.
Step 1: Login to your Google Workspace Admin Navigate to this link and login with your administrator account.
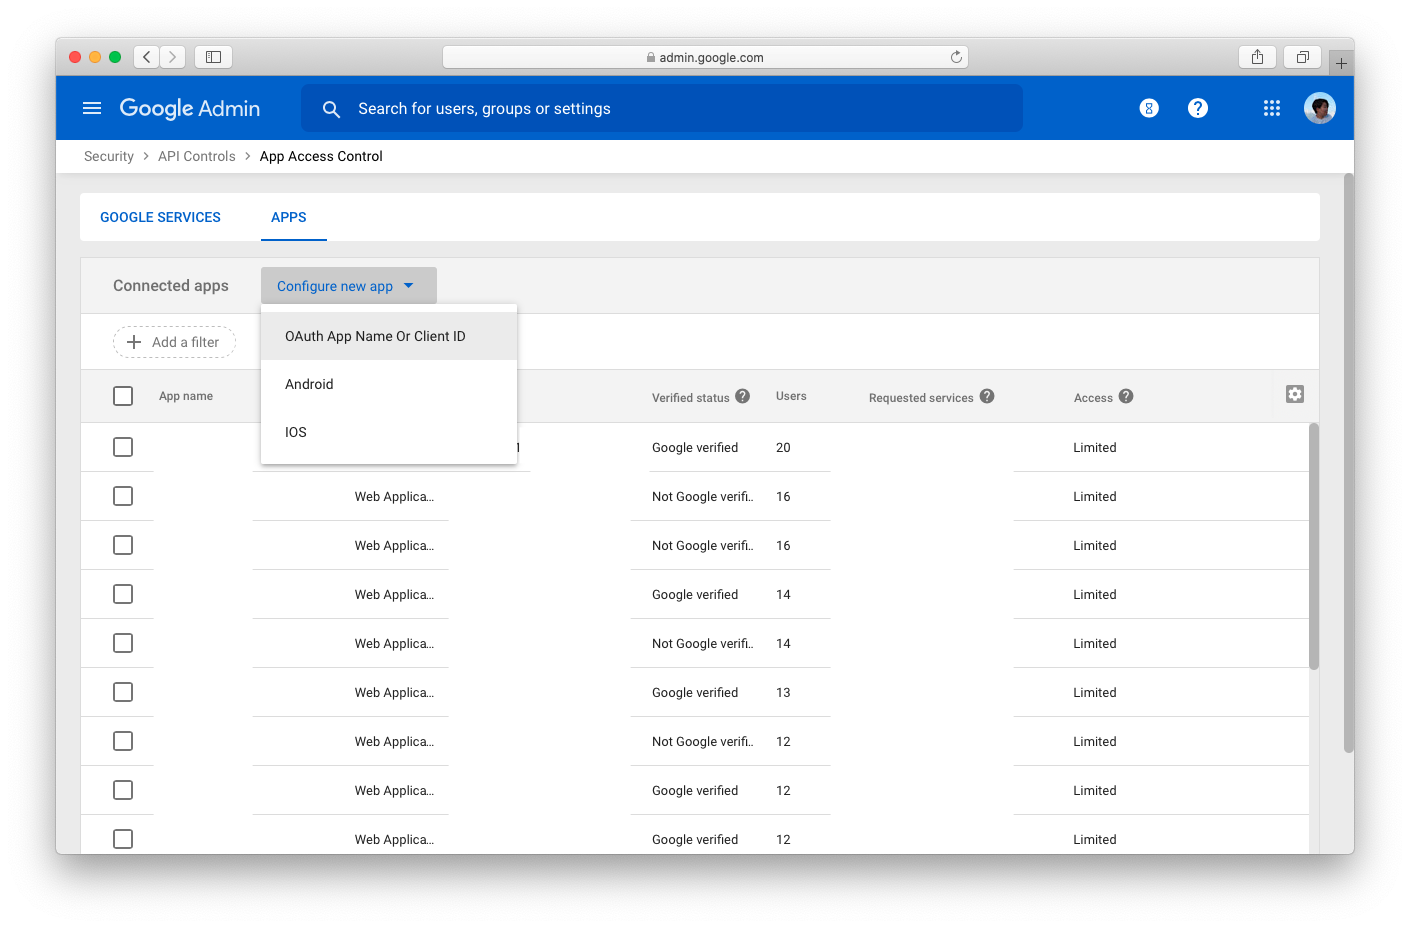
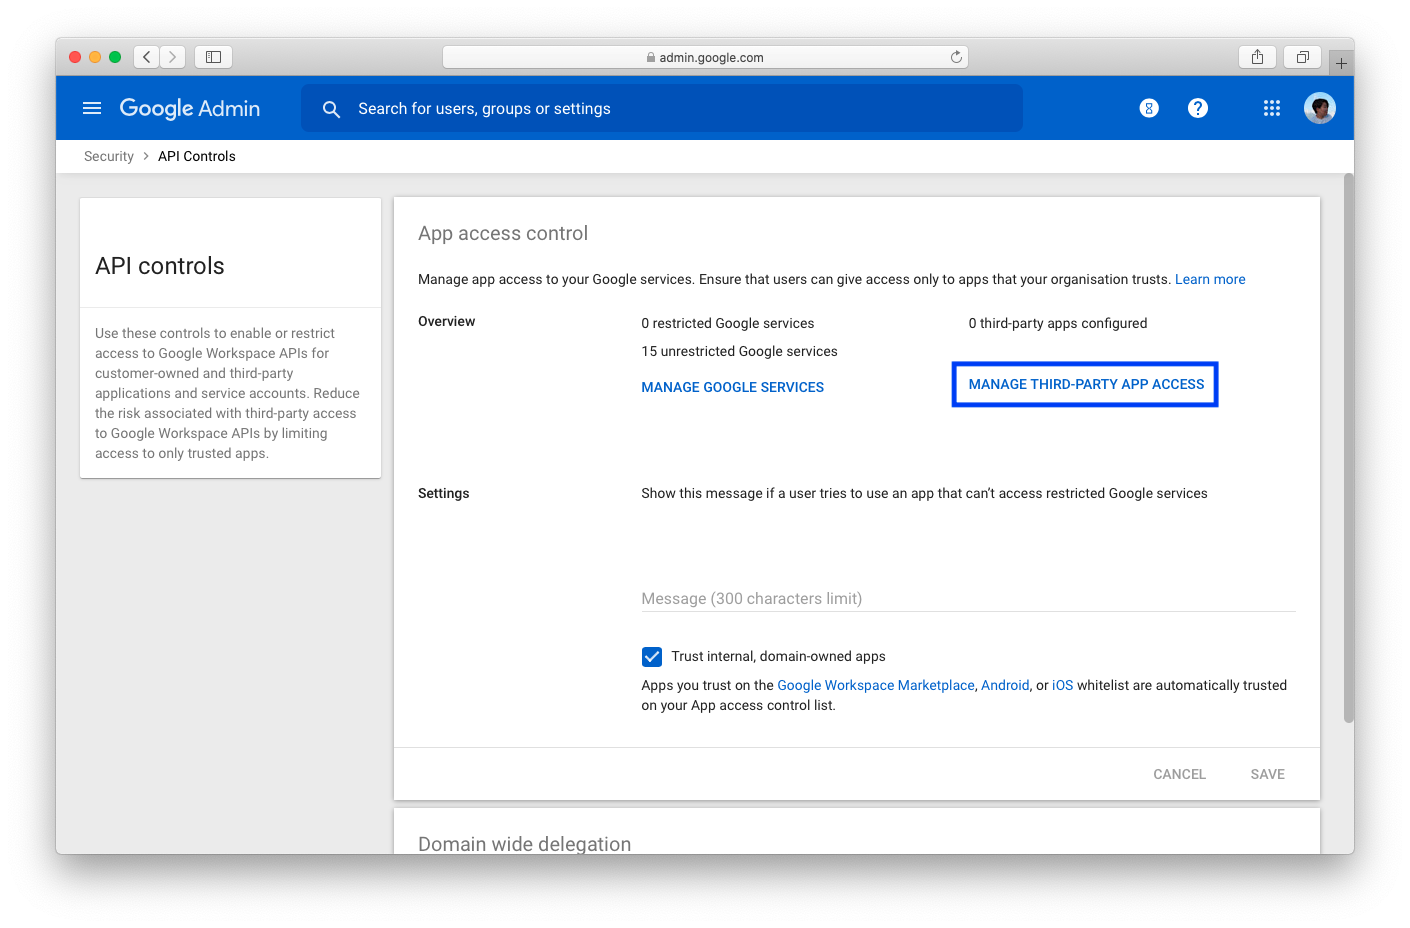
Step 2: Navigate to Security Settings From the navigation drawer, select Security > API Controls
Step 3: Locate API controls Navigate to the App Access Controls section and click MANAGE THIRD-PARTY APP ACCESS.
Step 4: Configure New app Click on Configure New App and choose OAuth App Name or Client ID
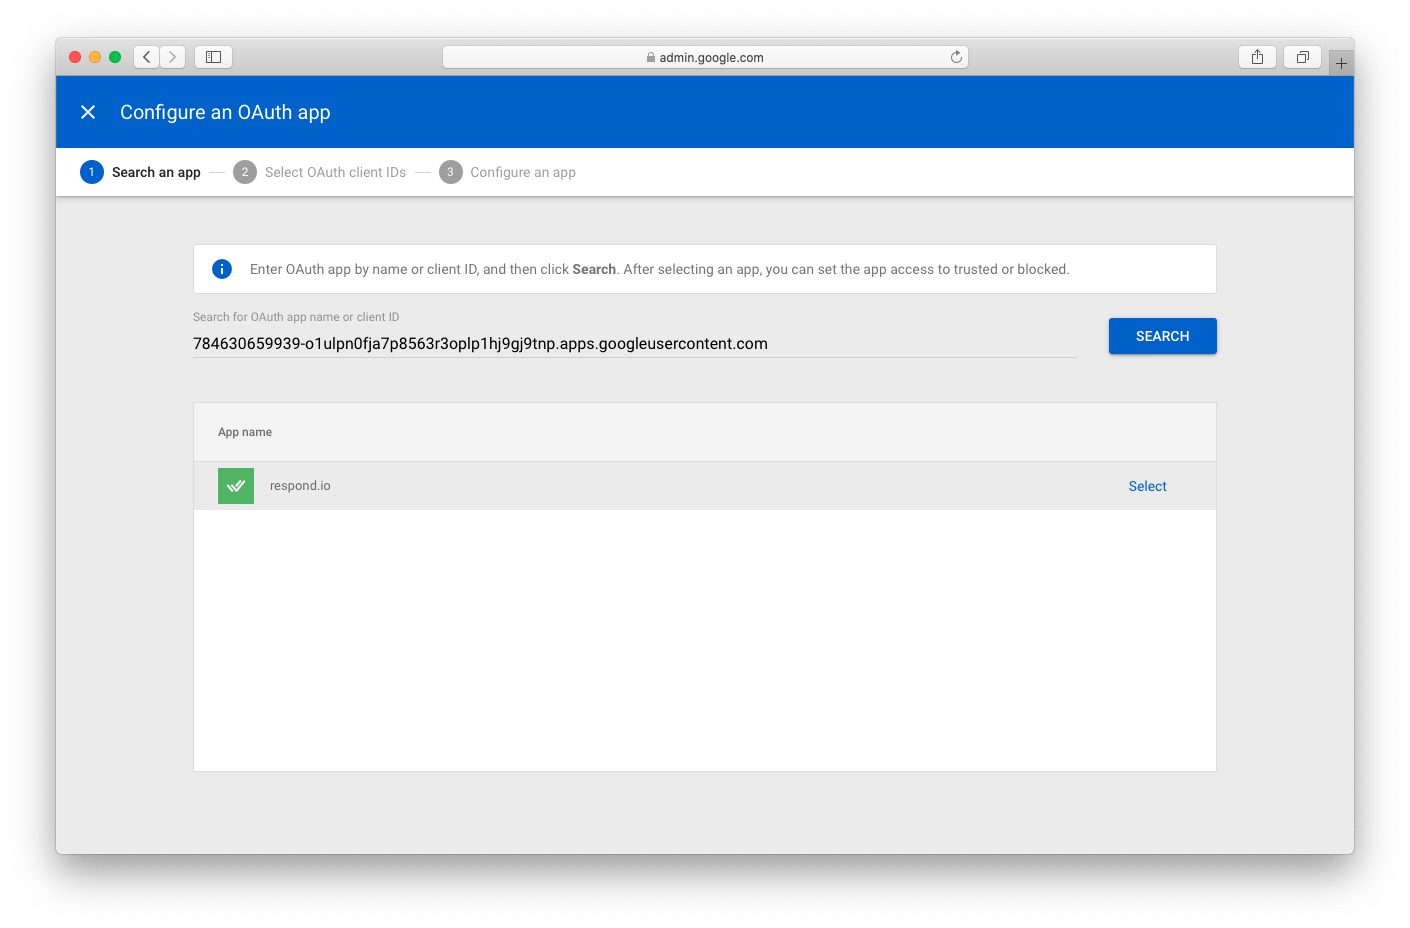
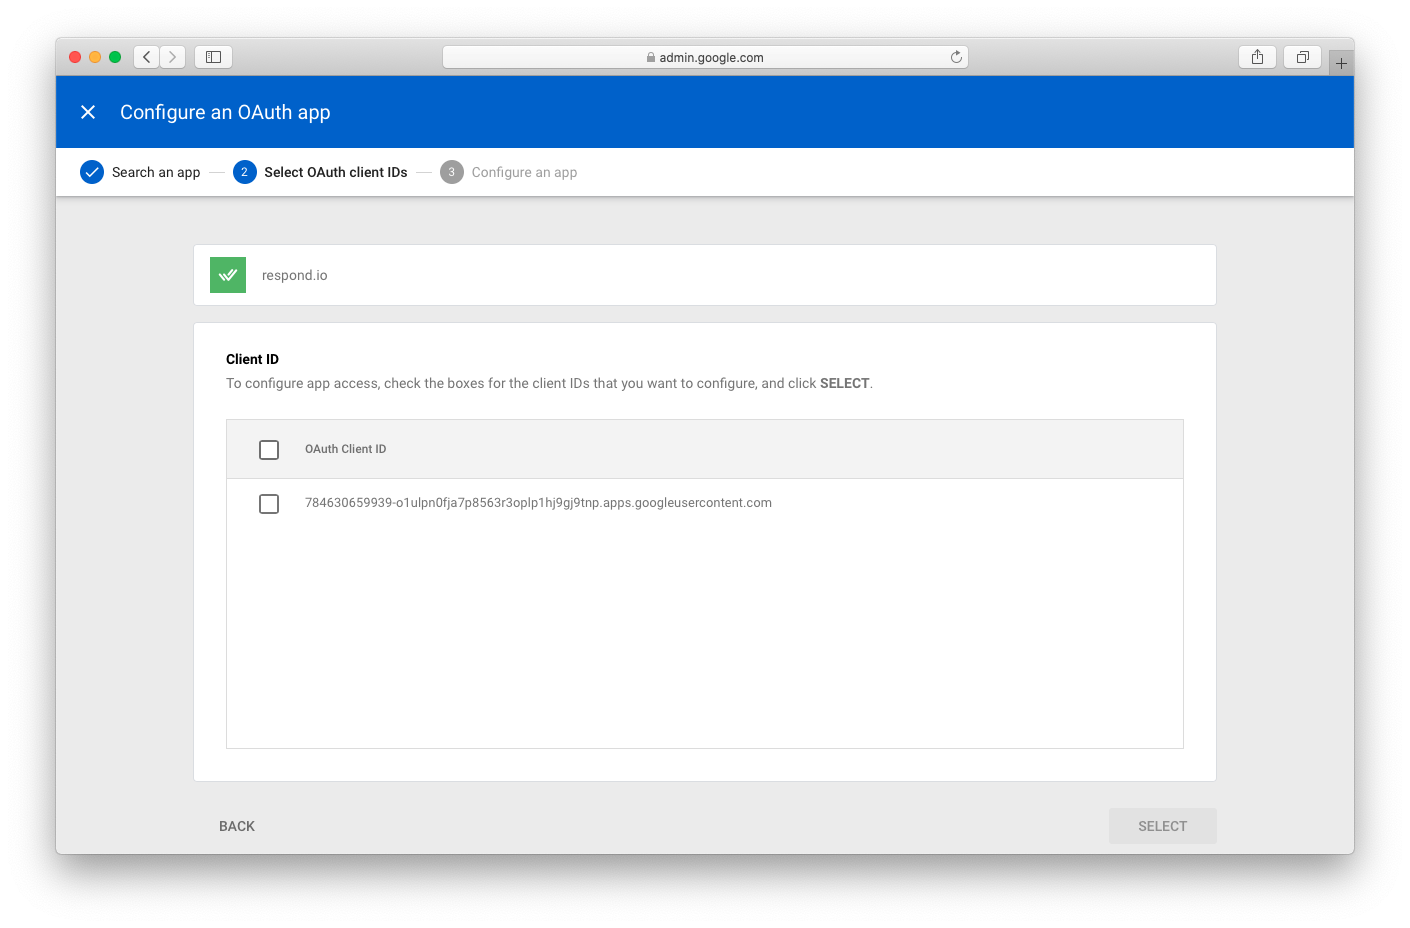
Step 5: Search for respond.io App Under Search OAuth App name or client ID, enter the client ID. Select the respond.io app.
Step 6: Select the OAuth Client ID Select the OAuth Client ID from the list that matches the provided ID above.
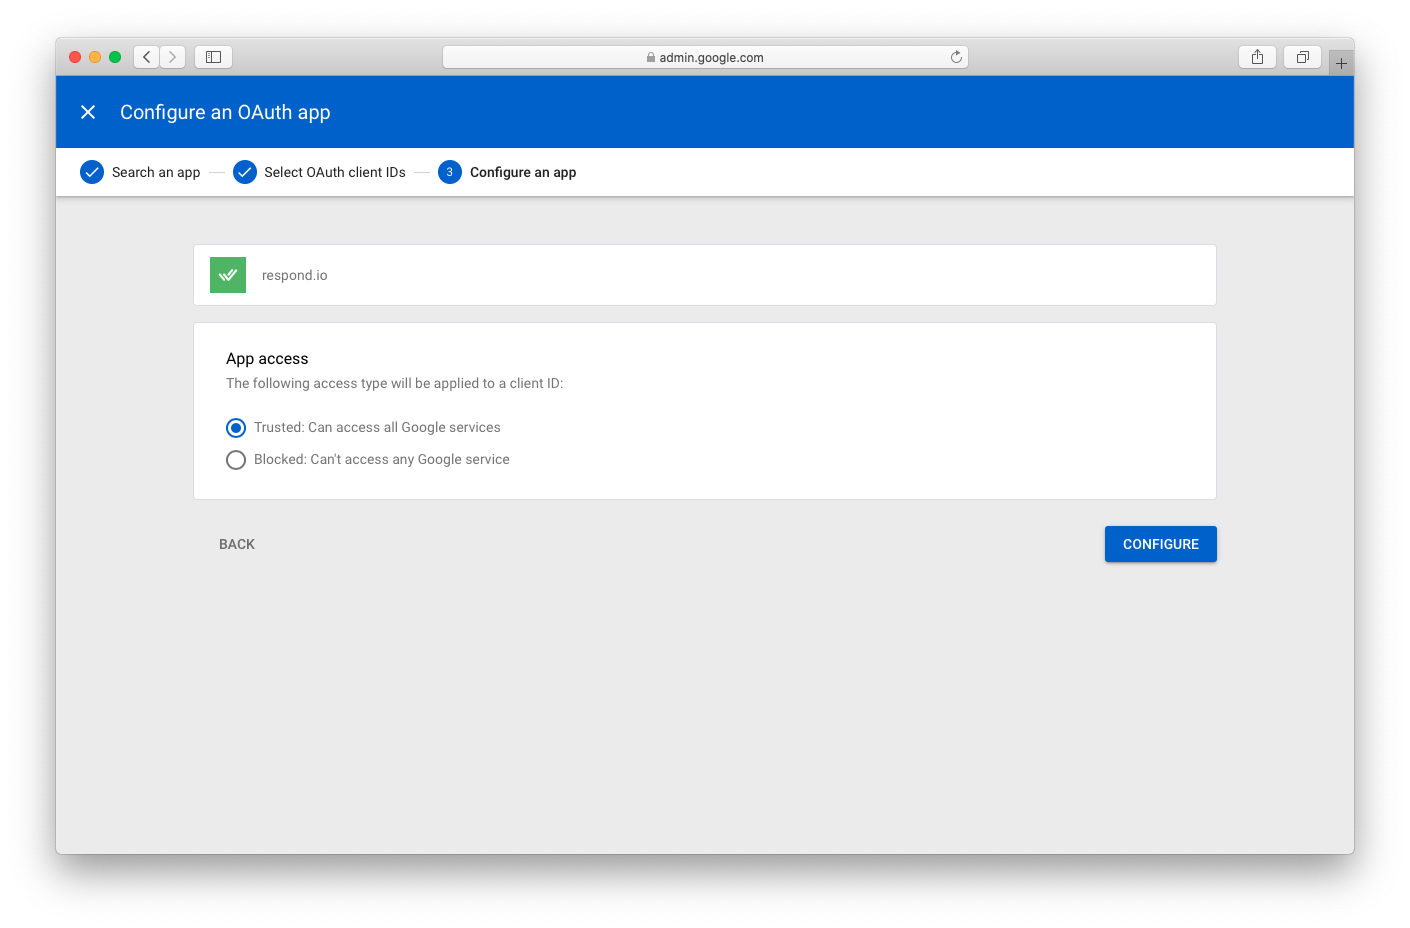
Step 7: Confirm and Add Select Trusted to allow access. Press Configure to add the respond.io Google app to your Google Workspace trusted list.
The app is now whitelisted and you may proceed to connect your organization's Gmail to respond.io
Connecting Gmail
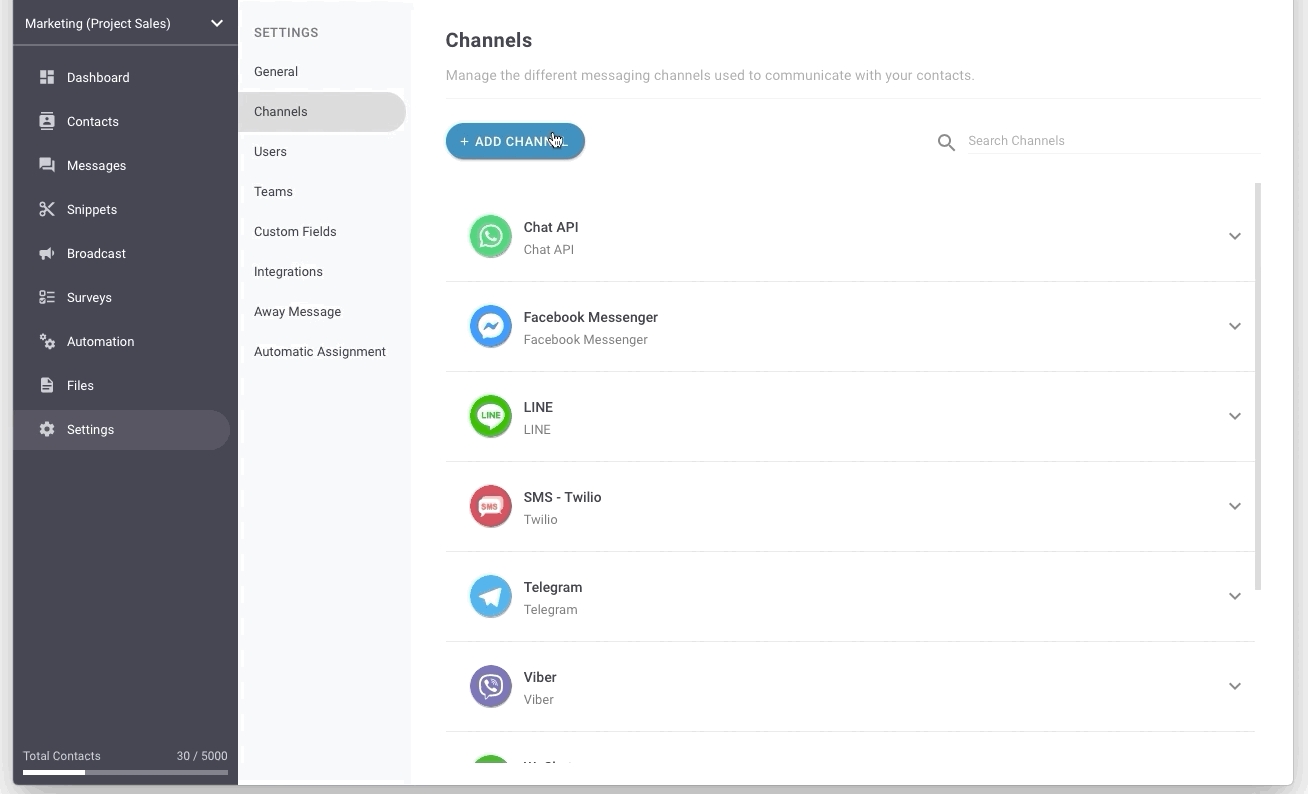
Step 1: Navigate to Channel Settings From Settings Module, navigate to the menu item, Channels
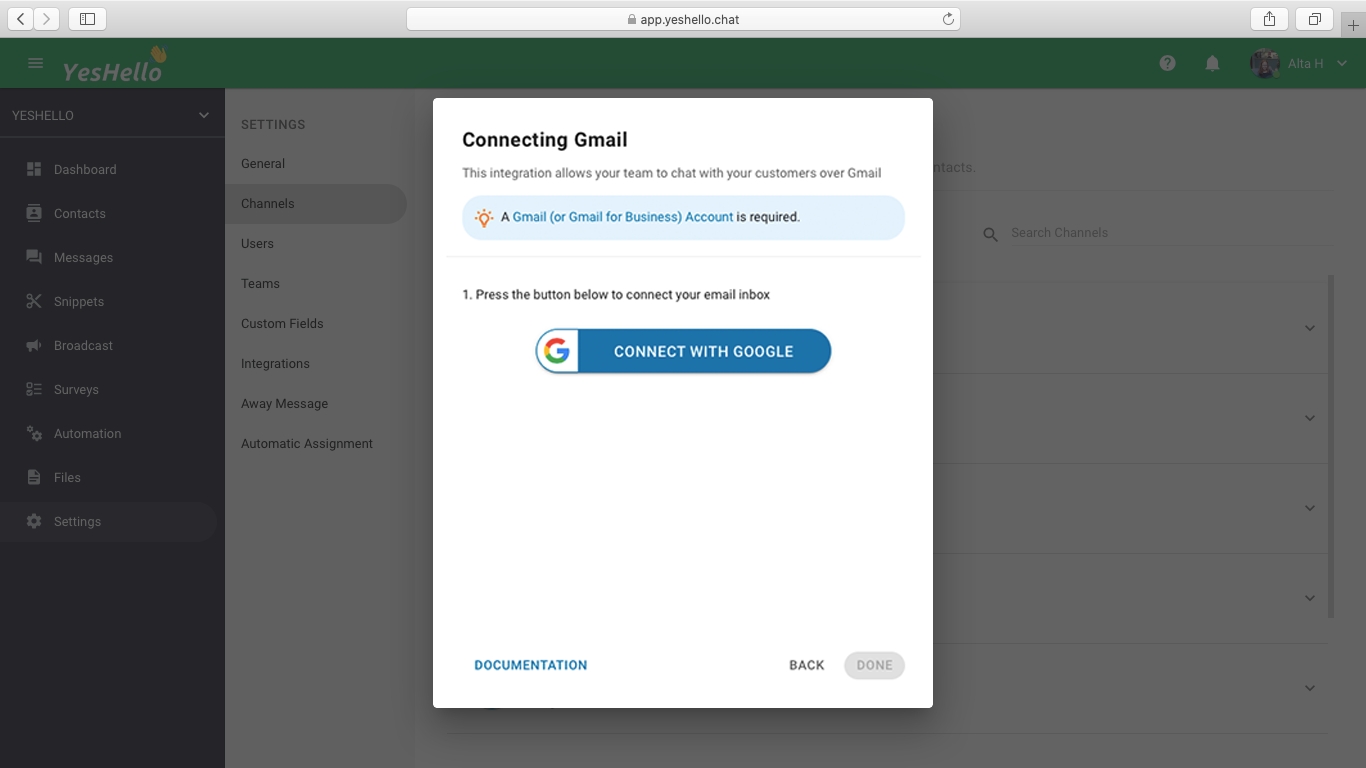
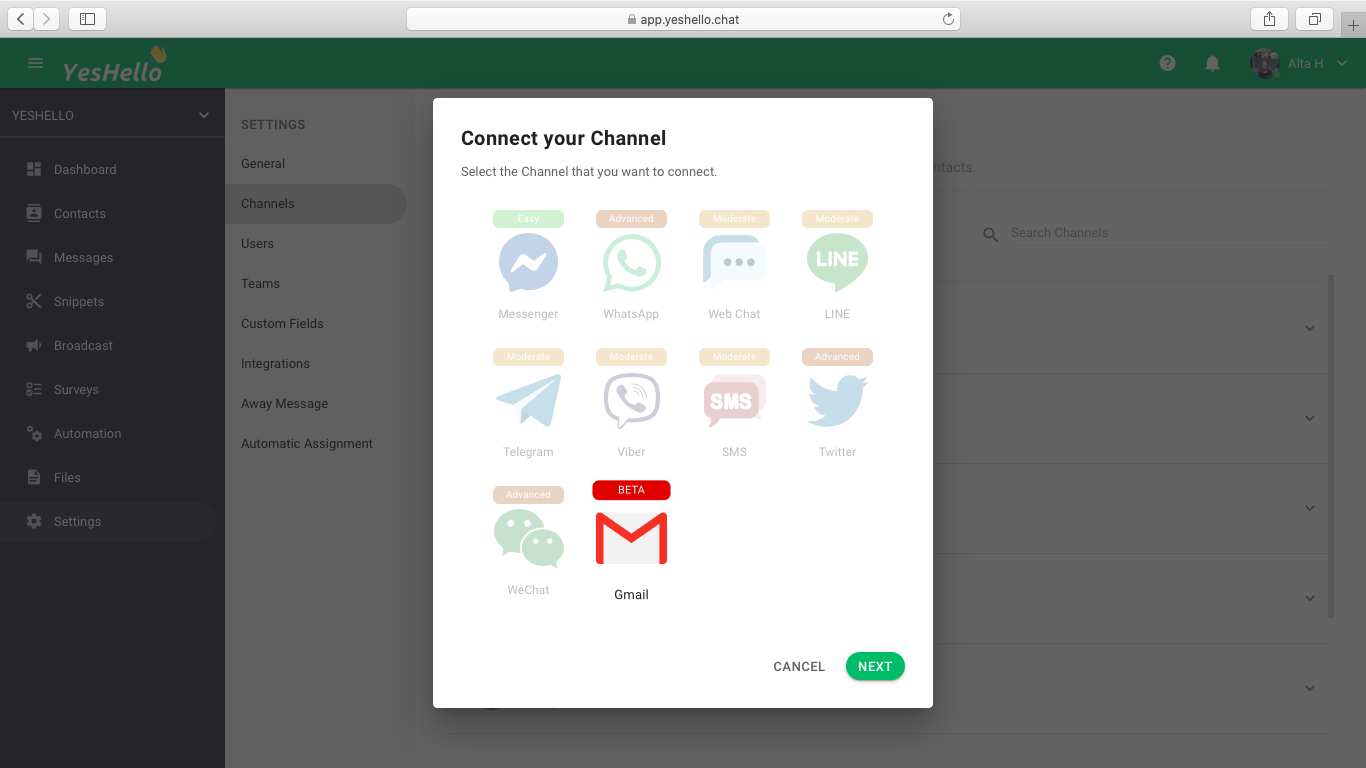
Step 2: Add Channel Press Add Channel and choose Gmail. The Connecting Gmail dialog should open up.
Step 3: Press Connect with Google button You will be directed to sign in with your desired Google account
Step 4: Review the account and Create Channel Once you have signed in with the desired Google account, the dialog will show the Gmail account and press Create Channel to confirm.
Once you completed the setup, any emails sent to your Gmail will now be received in your Space.
If you encounter errors when connecting to Gmail, please ensure that you have enabled cookies and pop up in your browser!
Channel Configuration
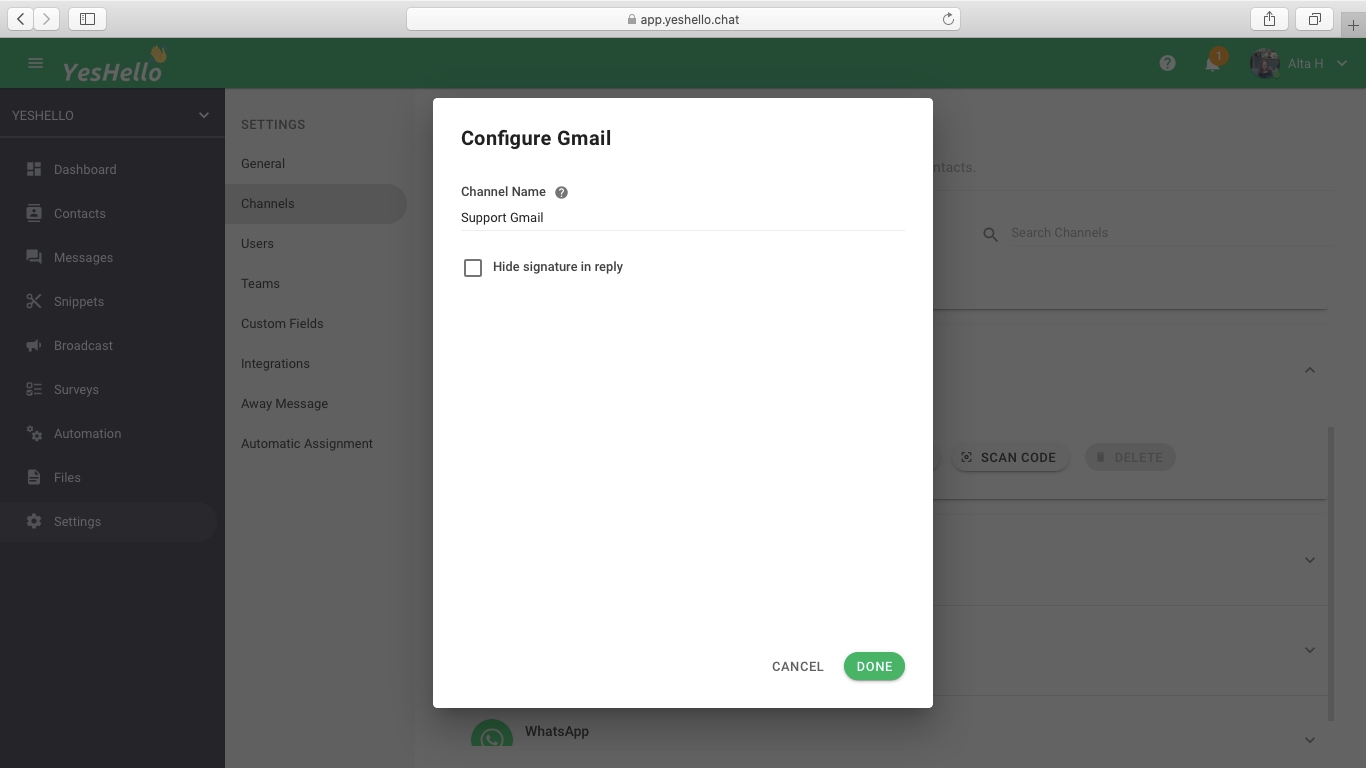
Gmail channel can be configured with a unique: - Channel Name
In replies to Gmail contacts, a default signature and branding will be included in the email. This can be hidden in the Configure Gmail dialog. Note: The ability to hide the respond.io branding is only available to organizations with subscriptions.
Step 1: Navigate to Channel Settings From Settings Module, navigate to the menu item, Channels
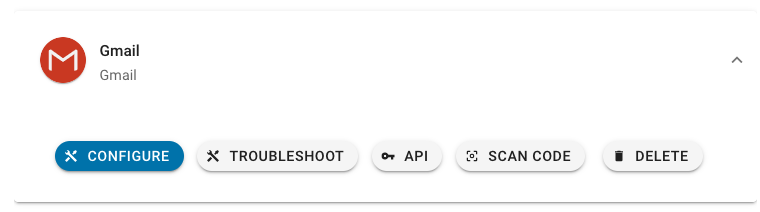
Step 2: Locate the Gmail channel Once you have located the Gmail channel, press Configure
Step 3: Make the necessary configuration You can configure the following:
Channel Name - Name used internally to identify the account
Hide signature in reply - Option to hide the default signature in replies to your Gmail contacts
Step 4: Update the configuration Press Done to update the channel configuration
Troubleshoot
Step 1: Navigate to Channel Settings From Settings Module, navigate to the menu item, Channels
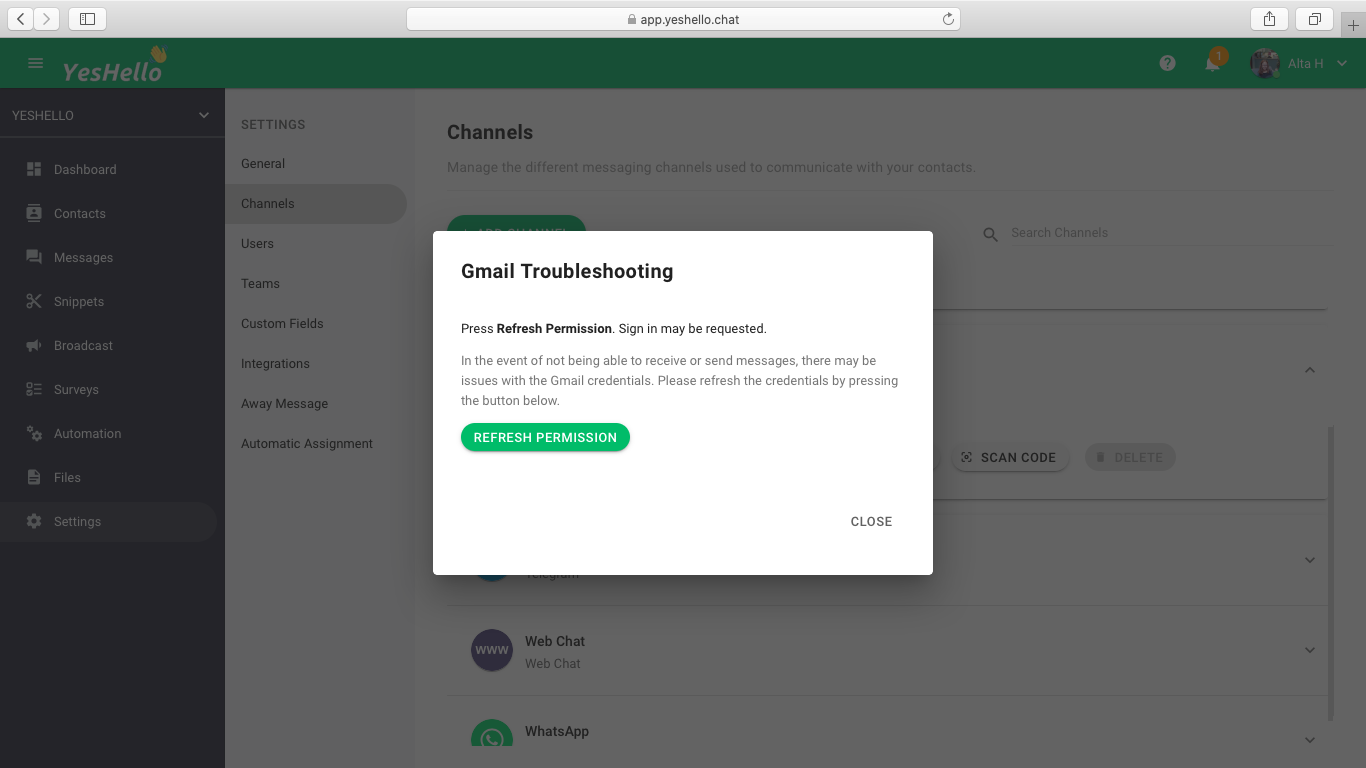
Step 2: Locate the Gmail channel Once you have located the Gmail channel, press TROUBLESHOOT
Step 3: Follow through the instructions
Having trouble with the channel? Contact us here!
Connecting Gmail
Step 1: Navigate to Channel Settings From Settings Module, navigate to the menu item, Channels
Step 2: Add Channel Press Add Channel and choose Gmail. The Connecting Gmail dialog should open up.
Step 3: Press Connect with Google button You will be directed to sign in with your desired Google account
Step 4: Review the account and Create Channel Once you have signed in with the desired Google account, the dialog will show the Gmail account and press Create Channel to confirm.
Once you completed the setup, any emails sent to your Gmail will now be received in your Space.
If you encounter errors when connecting to Gmail, please ensure that you have enabled cookies and pop up in your browser!
Channel Configuration
Gmail channel can be configured with a unique: - Channel Name
In replies to Gmail contacts, a default signature and branding will be included in the email. This can be hidden in the Configure Gmail dialog. Note: The ability to hide the respond.io branding is only available to organizations with subscriptions.
Step 1: Navigate to Channel Settings From Settings Module, navigate to the menu item, Channels
Step 2: Locate the Gmail channel Once you have located the Gmail channel, press Configure
Step 3: Make the necessary configuration You can configure the following:
Channel Name - Name used internally to identify the account
Hide signature in reply - Option to hide the default signature in replies to your Gmail contacts
Hide YesHello branding in reply - Option to hide the YesHello branding in replies to your Gmail contacts (Available to organizations with subscriptions)
Step 4: Update the configuration Press Done to update the channel configuration
Troubleshoot
Step 1: Navigate to Channel Settings From Settings Module, navigate to the menu item, Channels
Step 2: Locate the Gmail channel Once you have located the Gmail channel, press TROUBLESHOOT
Step 3: Follow through the instructions
Having trouble with the channel? Contact us here!
Last updated