WhatsApp Advertising: How to Set up Facebook Ads and Connect With WhatsApp Business
Online marketing is getting more expensive. Here’s the good news. You’ll get a high return on your campaign if you get creative. Here's a case study about how our team generated 4240 Facebook Messenger Leads for about $400USD in ad spend.
In this article we’re going to cover:
Why our team created a Facebook Click to Messenger marketing campaign
The surprising results of our Click to Messenger marketing campaign
How our team set up the Click to Messenger marketing ad
How our team qualified 4,240 leads using chat automation
Why Create a Facebook Click to Messenger Marketing Campaign?
There’s a simple answer to this question. Along your road to online marketing success, try every possible method to create interest and generate leads about your product or service. One thing we’ve found on our startup journey is – no matter how logical or deliberate our actions, the internet is a mysterious place it surprises us everyday. If you’re lucky, you’ll have more good surprises than bad surprises. So roll up those sleeves and give it a try.
Our team created a Facebook Click to Messenger marketing campaign for one simple reason. We were looking for 50 people to participate in a closed beta for our WhatsApp integration. Although we already had plenty of users to pull from to create a pool of closed beta users, we also wanted to get feedback from users that had never used YesHello before but were in need to for chat automation for WhatsApp.
As we are also a Digital Marketing Agency, our team are used to running Facebook Click to Messenger ads for clients in the past, but for this campaign, we only had a few days and a limited budget to pull it off. The amount of Facebook Messenger leads we generated astonished even us…
Surprise #1: Our Click To Messenger Ad Generated 4240 Facebook Messenger Leads
We were genuinely surprised at the cost per result. We know that Click to Messenger ads were still cheap because they were seldom used. However, the cost per lead was a big surprise.
We generated 4240 Facebook Messenger leads for our WhatsApp closed beta over three days, and we spent about $400 USD to do it. Overall, our cost per lead ended up being around $0.10 USD.
We targeted our ad to run globally. We did exclude some countries where historically we’ve seen bot-like behaviour and our return on investment in previous campaigns meant we weren’t going to target there again. Overall we did hit every continent except Antartica.
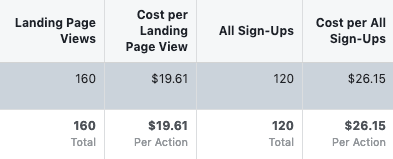
Surprise #2: Our Click to Messenger Ad Generated at least 120 Sign Ups
This was perhaps the happiest surprised. We don’t have the highest budgets for generating users sign-ups, and we thought that running this messenger campaign to generate leads for our WhatsApp closed beta would result in a reduction in the number of total sign-ups we got in that week. Thank god we wrong.
We do admit that the cost per sign up was a tad bit higher than we see with our best-optimized campaigns. However, considering we did not optimize this ad at all with a little tweaking Facebook Click to Messenger marketing campaigns may become the bread and butter of our paid sign up campaigns.
This generated at least 120 sign ups. But we are not done working with these leads. First, we’re going to use them to chose 50 users for our closed beta program. But at the end of the day, they’re now contacts in the YesHello platform.
This means we have 4,000 more people to send our Facebook Messenger blog & platform updates to. And we have 4,000 potential customers to reactivate once we’ve released our WhatsApp integration publicly. With our Facebook Messenger open rates hovering at around 92% we’re sure this is going to result in at least a couple hundred sign-ups somewhere down the line.
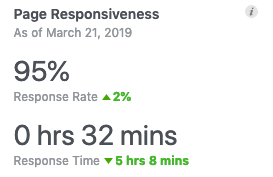
Surprise #3: Our Facebook Page Responsiveness Skyrocketed
You may asking why is this important? Every person that comes to your Facebook Page sees how responsive you are to messages on average. The more responsive you are, the more people are going to click and chat with you, which means more Facebook Messenger leads.Facebook Page Responsiveness
Unfortunately, we’re not a global company, yet. However, we do have customers all around the globe that used Facebook Messenger to chat with us for support. People who are on the other side of the planet and message us first thing in the morning must often wait a few hours before we can give them a detailed response, dragging our average response time down.
One of the surprising results of this Facebook Click to Messenger marketing campaign was that it raised our averages way up. Unlike customer support, which in our case involves some very complicated questions, we qualified all these leads using automation on the YesHello platform.
How To Set Up a Facebook Messenger Marketing Campaign for Lead Generation
Below we’ve going to go over how we set up our Facebook Click to Messenger marketing campaign. To copy what we did you’re going to need a:
A Facebook Page
A Facebook Ad Account
A YesHello Account – Sign Up Free Here
How We Set Up Our Click to Messenger Ad
Although we’re going to be generating Facebook Messenger leads, we’re not going to be doing this using Facebook Messenger lead ads. This is because we want these leads to message us and enter the YesHello platform. Once that’s done we’ll be able to chat with them and reengage them over Facebook Messenger in the future.
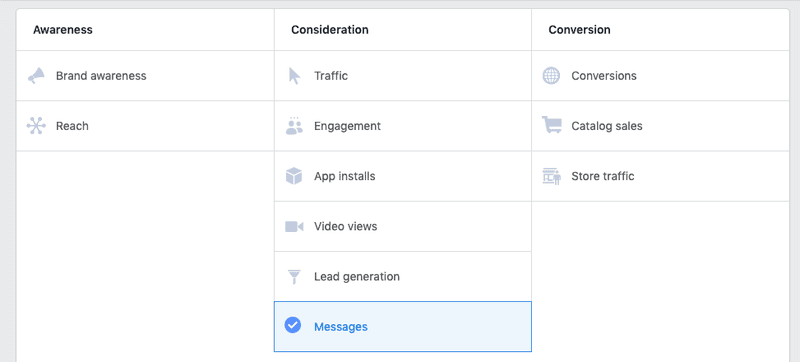
1. Create a campaign with messages objective. To generate Facebook Messenger leads you’ll need to select the messages objective. Choosing this objective will mean your call to action will become Send Message.
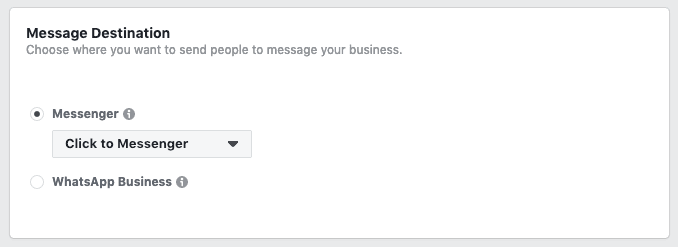
2. Set your message destination to Click to Messenger. At the ad set level choose the Click to Messenger destination.
3. Choose your audience. We’re not going to share our audience for this campaign, but it wasn’t anything special. We used a few interests provided by Facebook and excluded some geographies to create our audience.
4. Choose your ad placement. We used automatic ad placement.
5. Select your budget and schedule. We used a lifetime budget over 3 days and we scheduled our ad to run only during business hours from the users perspective.
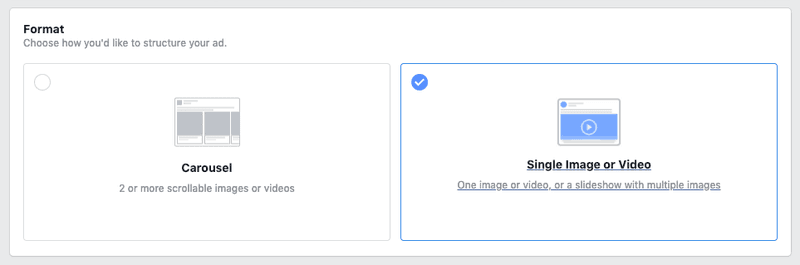
6. Choose your format. Our ad was a simple image so we chose image.
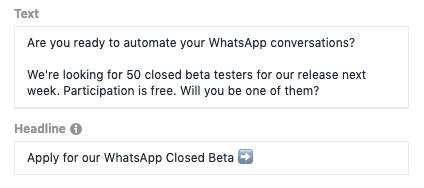
7. Enter a text & headline for your ad. Unfortunately, Facebook does not allow dynamic text & headlines for these type of ads. We do recommend that for the best performance you test out text and headline messaging using a dynamic image ad before you run this campaign.
8. Set up a tracking reference. You’ll need to set up a tracking reference for your Click to Messenger campaign. Use the format ref=YOURREFERENCE. The reference will be used to trigger a rule on the YesHello platform, so this step cannot be skipped.
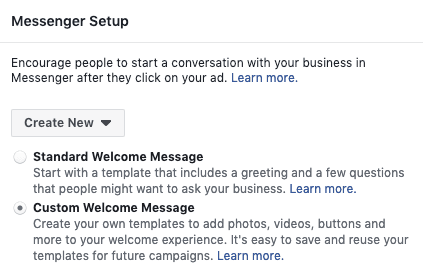
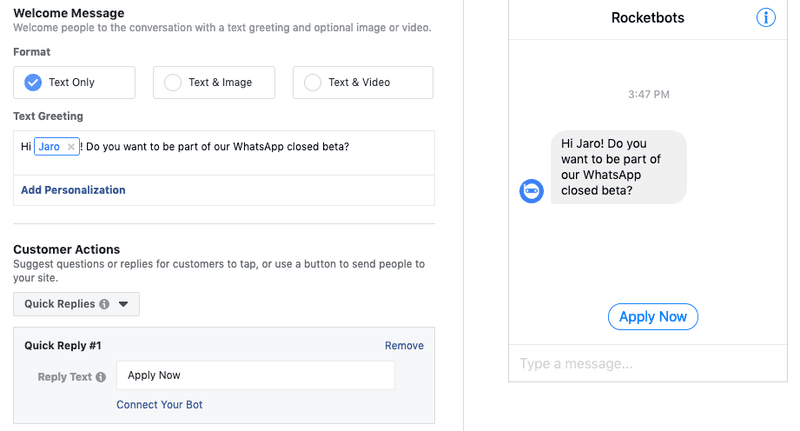
10. Create a custom welcome message. Facebook Messenger users must send at least one message to you in order for you to receive the lead. The best way to achieve this is to set up a custom welcome message specifically for this campaign.
We created this custom welcome template.
11. Publish. Just make sure your campaign doesn’t start right away because you’ll need to do a little setup on the YesHello platform.
How We Qualified 4240 Click to Messenger Leads Automatically
We had no choice but to qualify these leads automatically because we don’t have the staff to handle 4000 Facebook Messenger leads over 3 days. Especially the ones that come in overnight. To qualify these leads automatically we had to do the following:
Create a qualification survey
Create an automation rule
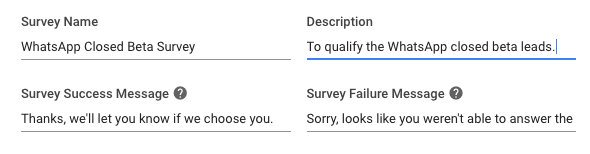
How We Created The Qualification Survey
Because our WhatsApp closed beta is targeted towards businesses who are already using WhatsApp we decided on 3 simple questions to ask:
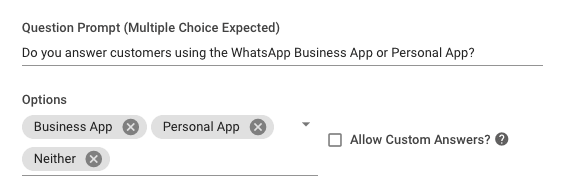
Do you answer customers using the WhatsApp Business App or Personal App?
How many messages do you send & receive per day? (Roughly)
Do you use Broadcasts to send messages to your contacts in the WhatsApp Business App?
These questions were designed to give us an indication of the quality of the Facebook Messenger leads that we generated.
1. Create a new survey. Go to the surveys module. Press Add Survey. We added a name as well as survey success and survey failure messages to our survey.
2. Add your questions. We used multiple choice responses for our 1st & 3rd questions and number only responses for our 2nd question.
Repeat step 2 for as many questions and you have and press done once you’ve finished creating your survey.
Now you’ll need to create a rule to trigger this survey every time a new contact enters from the Facebook Send to Messenger ad.
How We Triggered The Qualification Survey For Every Contact From Our Messenger Marketing Campaign
To ensure that every Facebook Messenger lead that we generated received the qualification survey we created a rule in the Automation module.
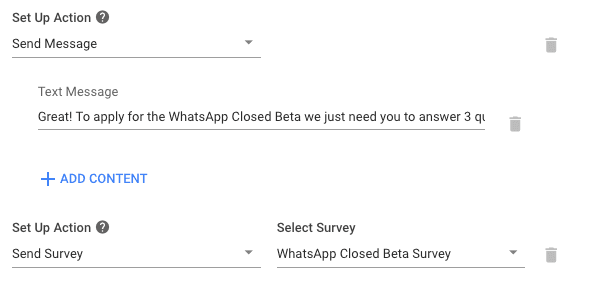
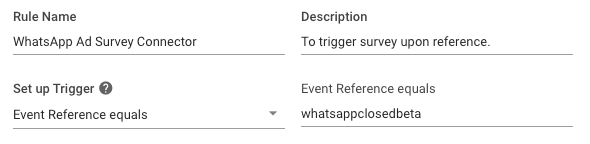
1. Add a new rule & set up your trigger. Remember in step 8 of our Facebook Click to Messenger ad creation we created the tracking reference: whatsappclosedbeta. Now we’ve created a rule which is triggered by that reference.
2. Set up your actions. We wanted to send our Facebook Messenger leads an explainer message and then receive the first question of our survey. So we created two actions. One to send a message and another the send the survey.
We also created an additional action at the end of the rule so that we could segment contacts added to the YesHello platform via this messenger marketing campaign. This action added the tag WhatsApp Closed Beta to all the contacts.
Now press done to create the rule and you’re ready to go.
Final Thoughts
Make sure you test the final experience of the users who receive the ad and go through the qualification survey. To do so go to the Ads tab of your Facebook Ad Manager, select the ad, click preview, then select Ad Preview then press Send Notification to Facebook.
Good luck with your Facebook Click to Messenger marketing campaigns. We wish you many Facebook Messenger leads to come.
Last updated